
iMON Receiver Installation Instructions for HT-100/101/200/201 series Accent HTPC Case
Revision 1.1 © 2004 Quietpc.com
These instructions will tell you how to install your iMON receiver in an easy-to-follow manner. If you are used to taking the lid off your PC, you should find the installation reasonably straightforward. You may like to print out these instructions so you can refer to them while you are upgrading your machine. However, if you are in any doubt as to your own competency in PC hardware installation then for the safety of yourself and your PC, please ask an expert engineer to do the work for you! These instructions are for guidance only and no responsibility or liability can be borne by Quietpc.com for damage or loss incurred, (including data loss) howsoever caused, either directly or consequentially.
IMPORTANT: Before starting, ensure you have backed-up the data on your hard drive. You should be in the habit of doing this regularly in any case, as hard drives are never 100% reliable and total data loss can be disastrous if no other copy exists. The hard drive is at a higher than normal risk of failure due to accidental damage while a PC upgrade is in progress.
1. Package Contents
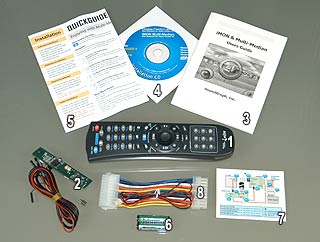
- Black RSC remote controller
- IR Receiver plus motherboard cables and stud
- iMON & Multi-Median user guide
- Installation CD
- Quick guide
- 2 x AAA Batteries
- Installation diagram sticker
- ATX extension iMON power cable
2. Installing the stud
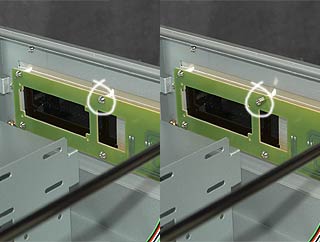
Once it is located remove the screw and then screw in the supplied stud (as shown). Don’t lose the screw you have just un-screwed, you’ll need it later!
3. Installing the IR receiver PCB
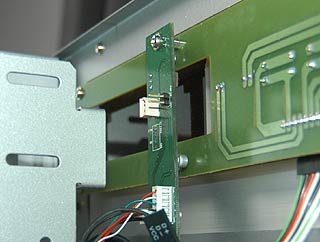
If the PCB is not installed exactly as shown then the IR receiver will not work.
5. Installing the rest of the cables
After installing your other components like motherboard, PSU etc. You can then follow the User Guide as to where to connect the cables coming from the IR receiver PCB and the ATX Extension Power Cable. You will need your motherboard manual to help you do this.
When installed correctly you should be able to turn your PC on and off with the remote controller. If this is not possible just check your installation.