
SilentDrive™ Installation Instructions
Revision 1.7 © 2003 Quietpc.com
These instructions will tell you how to install your SilentDrive™ acoustic drive enclosure in an easy-to-follow manner. If you are used to taking the lid off your PC, you should find the installation reasonably straightforward. You may like to print out these instructions so you can refer to them while you are upgrading your machine. However, if you are in any doubt as to your own skill in PC hardware installation then for the safety of yourself and your PC, please ask an expert engineer to do the work for you! These instructions are for guidance only and no responsibility or liability can be borne by Quietpc.com for damage or loss incurred, (including data loss) howsoever caused, either directly or consequentially.
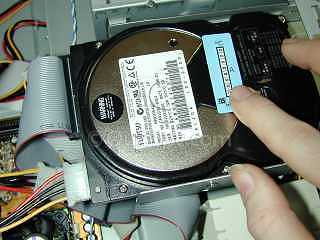
In order to determine compatibility with your own particular hard drive, we optionally supply a temperature-sensitive label which you should affix to the surface of your hard drive. This shows how hot the hard drive becomes while enclosed in the SilentDrive. Instructions are given below on how to use the label and interpret the result it shows. You should take time to use the sticker provided to verify your hard drive will not be liable to overheat inside the SilentDrive. A hard drive which runs in excess of the manufacturer’s specified maximum temperature may fail prematurely. As an alternative to the sticker, you could use software such as DTemp.
Most manufacturers specify a maximum operating temperature of around 60-65°C, and links to manufacturers’ websites are given at the end of the instructions so that you can check your own particular drive. Please note we cannot accept responsibility for failed drives, so you should use the temperature label or DTemp software to be sure that your drive will be safe.
IMPORTANT: Before starting, backup the data on your hard drive. You should do this regularly in any case, as hard drives are never 100% reliable and total data loss can be disastrous if no other copy exists. The hard drive is at a higher than normal risk of failure due to accidental damage while a PC upgrade is in progress. Right, lecture over, now on with the installation!
1. Getting Started
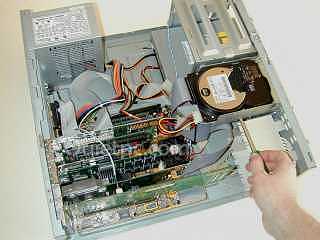
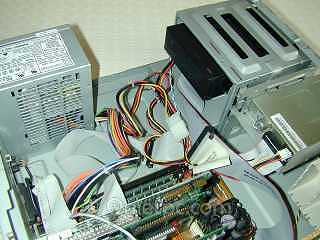
Carefully unscrew the hard drive mounting screws and remove the drive from the chassis, taking great care not to drop it or knock it against any hard surface - hard drives are extremely fragile! Keep the screws safe as you will need them to mount the SilentDrive enclosure later on. Do not touch any printed circuit board (PCB) either on the hard drive itself or on any other board within the computer, since any static electricity in your body could cause unseen internal damage to the components on the PCB.
2. Checking the temperature (OPTIONAL)
At this point, you may wish to replace the hard drive and run the machine for a couple of hours to find out what the normal running temperature of the drive is before installing your SilentDrive. If you wish to do this then now is the time! You should replace the computer’s case cover while testing to ensure an accurate result is obtained. Make a note of the result before going on to the next step because this temperature will be surpassed on the sticker display by the higher temperature reached when the drive is installed inside the SilentDrive.
3. Insert drive
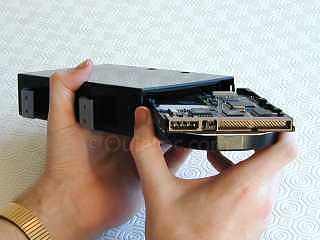
Push the whole drive inside very slowly, making sure that the metal plate adjacent to the PCB side of the drive does not catch any raised components or connectors as the drive moves inward. You should orient the drive as shown in the picture, which may seem “upside-down”. However this is not a problem since hard drives are designed to be run in any orientation as long as they are mounted either completely horizontally or vertically (not at a slant).
Optionally, you can use two screws to secure the drive inside. The SilentDrive enclosure has holes cut in the correct position on one side (you can see these holes in the photograph, at the far edge). However, it is usually best not to use these screws because the drive fits very tightly as it is, and cannot really move anywhere. Screws will increase the vibrations transmitted from the drive into the SilentDrive™ and therefore the noise level will also increase. The only time you would use screws here would be if you are very concerned about securing the drive as firmly as possible, such as when doing an installation in a vehicle for example.
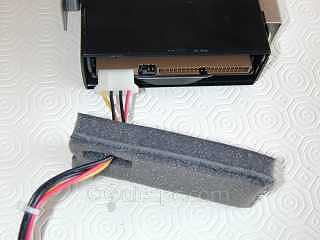
4. Prepare the foam
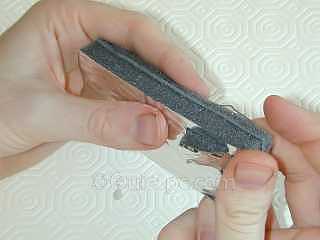
Please note: sometimes the hole in the foam is cut in a different position to that shown in these photographs. This means that when installed, the foam will be the “other way round”, i.e. silver side out. This is nothing to worry about, and is simply due to the press-out being cut from the other side during manufacture.
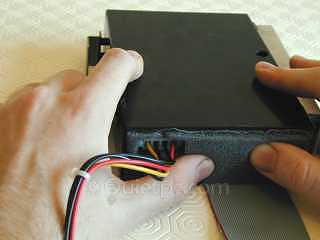
5. Install the SilentDrive
Place the foam so that the hole in the foam is next to the power connector hole on the hard drive. Then pass a power connector through the hole in the foam and plug it in. It helps if you are able to use a power connector for the drive which is at the end of a chain of connectors, rather than in the middle - this means that only four wires need to pass through the SilentDrive cap, not eight! This is not essential, but if you can do it, it means the cap will not require as much force to clip it on.
TIP: Sometimes it can be fiddly trying to do the installation inside your PC. Why not use a “wye” cable splitter to connect into your hard drive, then you can install the hard drive inside the SilentDrive on your desk (with the data cable disconnected from the motherboard). Once the cap is on, simply slide the assembly into your PC and connect the wye and data cables. Easy!
6. Insert the cable and foam
Be sure that the plugs are firmly seated in their sockets before continuing. This is the last chance you will have to check them and if they’re not properly connected, your hard drive will not work.
7. Apply the cap
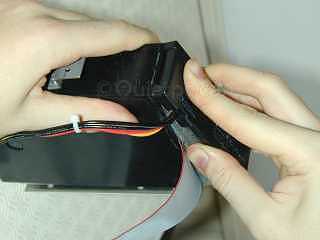
Depending on the cable layout in your PC, and the location of any adjacent drive(s), it may be more convenient to have the cables exiting from the “top” of the SilentDrive, rather than the bottom. This can be achieved either through mounting the SilentDrive “upside-down”, or by using a sharp knife to cut new holes on the other side of the SilentDrive cap. Either way would work fine, but please do not cut the cap if you think you may decide that the SilentDrive does not fit your needs and you wish to request to return it.
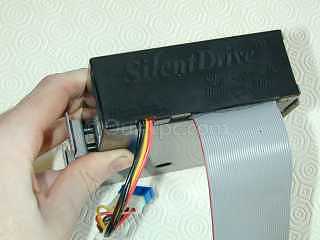
8. SilentDrive installed
9. Final temperature check (OPTIONAL)
If the highest blackened temperature shown is significantly less than the maximum temperature specified by the manufacturer (say by 10°C), you have nothing to worry about. If it is close to the manufacturer’s maximum temperature you may wish to run the drive for another couple of hours and then look again, to ensure you are reading the temperature when the drive has fully warmed up. If the indicated temperature is greater than the manufacturer’s specified maximum, then we recommend you abort the operation and return the SilentDrive for a refund, or use a different hard drive. However, very few hard drives exceed the manufacturer’s running temperature while enclosed in a SilentDrive.
10. How to read the maximum temperature reached (OPTIONAL)
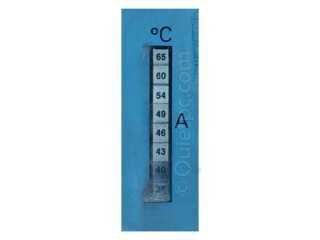
Most manufacturers quote a maximum running temperature of around 60-65°C, so the drive to which this particular sticker has been attached is in no danger whatsoever of overheating.
If you would like to check the temperature which the manufacturer quotes for your particular hard drive, try looking on the manufacturer’s website. For your convenience, here are some links to the most popular manufacturers. You should try searching for the model number of your hard drive, and then viewing the technical specification or datasheet, which should list the maximum running temperature.