D.Vine Quiet Media Center Software Installation Instructions
Revision 1.13 © 2006 Quietpc.com, written by Paul Lee
Before you attempt to install any software please make sure that all hardware is installed as per the Hardware Instructions.
Step 1 - Enter the CMOS (BIOS) settings
You’re now ready to switch on your PC for the first time, but before installing Windows itself, you’ll need to change a few settings in your motherboard’s CMOS Setup Utility. Some changes are necessary for any new PC installation, but others are specific to Windows XP MCE, allowing it to put itself to sleep and wake up again properly. These changes must be made before installing Windows.
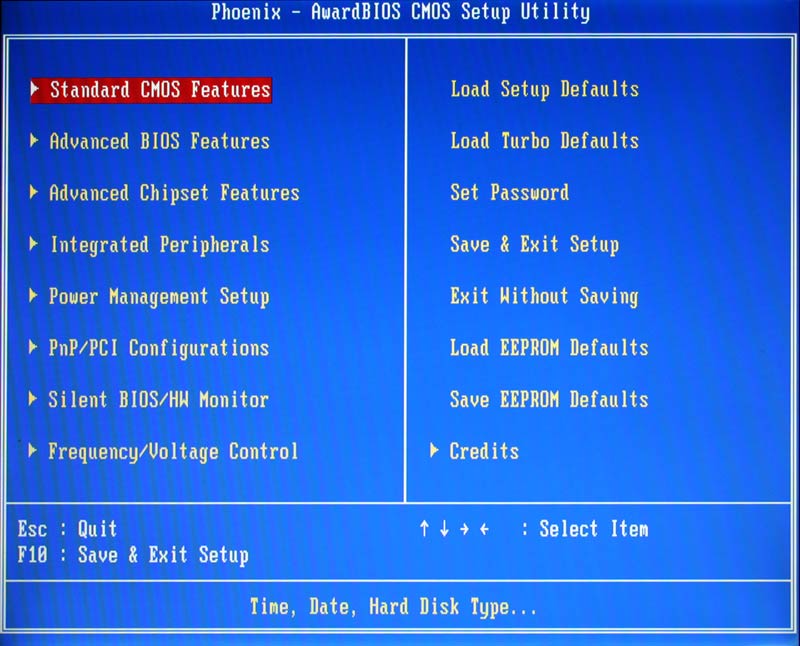
To access the CMOS Setup Utility, press the Del (Delete) key on your keyboard just after switching your PC on. Please note (if you have one) that you cannot use the Microsoft Remote Keyboard for XP MCE to enter the BIOS setup because the PC only enables the keyboard within Windows, so you will need to use a conventional USB or PS/2 keyboard in order to get the PC to recognise the fact that you have pressed the Del key. A few seconds later, the screen pictured here will appear, showing the various menu options. If this doesn’t appear, don’t worry - just switch your PC off and on again and try pressing the Del key once more. Use the arrow keys to navigate the CMOS Setup menus, then press Enter to select an option or to go into a different section; pressing Escape exits that particular section.
Step 2 - Booting and HDD settings
First press Enter to go into the “Standard CMOS Features” section, and change “Halt On” to “No Errors”. This will ensure that the PC can boot up successfully even if no keyboard is detected. While you’re here, set Drive A to “None”, since there is no floppy drive installed in the machine.
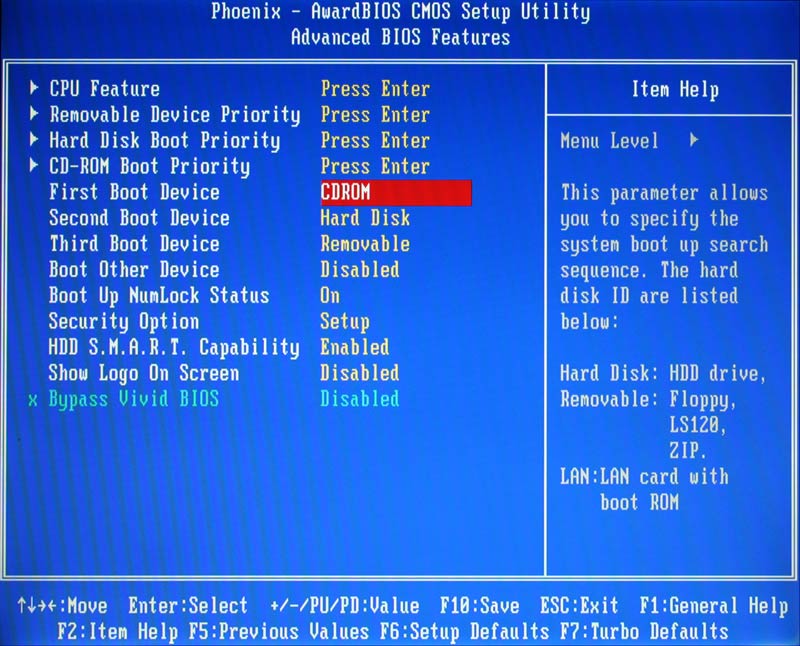
Press Escape to return to the main menu, then go into the “Advanced BIOS Features” section and change the “First Boot Device” to be “CDROM” as pictured - this will ensure your PC starts the Windows installation after exiting.
Press Escape again to return to the main Menu, then go into “Integrated Peripherals”, then the “OnChip IDE Device” section. Since you’re using a Serial ATA hard disk, you should change the “On-Chip Serial ATA” option at the top of the screen to “Auto”, then press Enter to accept, followed by Escape to return to the main menu.
Step 3 - Power Management
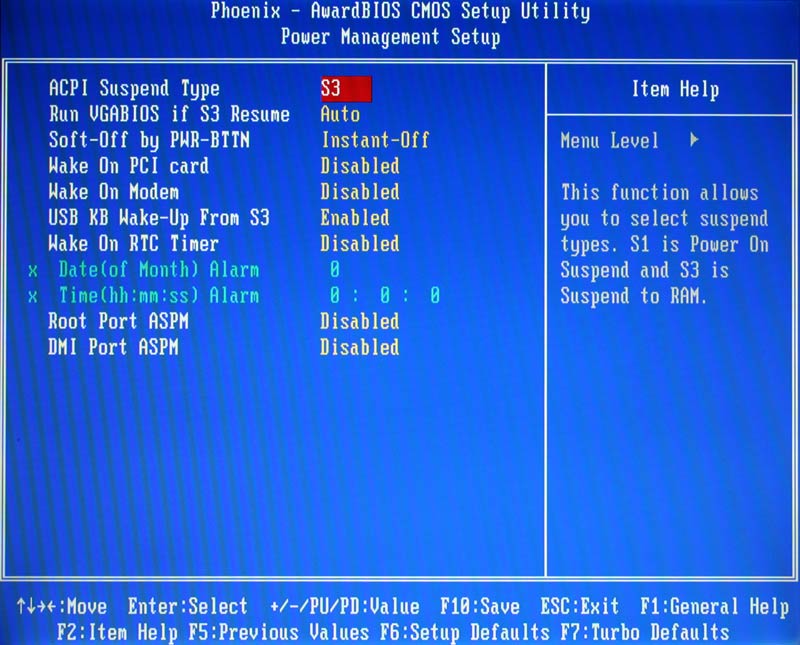
Now for the MCE-specific changes. From the main menu, go into the “Power Management Setup” section which is pictured. Here you’ll need to change “ACPI Suspend Type” to “S3”, and you’ll also need to change “USB KB Wake-up from S3” to “Enabled”. It’s crucial both these options are correctly selected before installing Windows. Now press Escape to return to the main menu.
Step 4 - CPU Fan Settings and TV Format
Next, go into the “Silent BIOS / HW Monitor” section. This will allow you to choose when the processor’s cooling fan comes on, although this can optionally be controlled with a greater degree of sophistication from Windows later*. If you’d like to do it here, ensure the “CPU Warning Temp” is “Disabled”, the “Fan Mode” is set to “Smart Control” and the “CPUFAN Smart Temp” is set to “70 degrees C / 158 degrees F”. You can now press Escape to return to the main menu.
*Note: if you install the Aopen i915GMm-HFS Utility program (version 1.00.04), you can use it to configure a very user-definable configuration of fan speed in response to temperature. However, due to a bug in this version of the program, the setting is not retained and the fan speed reverts to “Full speed”, which is very annoying! For this reason we would suggest that you do not use this program, but instead rely solely on the BIOS settings mentioned above. Doing so will ensure the lowest possible noise level.
The final step in these menus is to go into the “Advanced Chipset Features” section. In here is a setting called TV Format. If you plan to connect your Quiet Media Center to a television, you need to set the TV Format to match the broadcast system which the television will be compatible with for the country in which it is being used. In the UK for example, you need to set TV Format to PAL_I. In general, the effect of not having this setting set correctly is that you will receive a monochrome picture or no picture at all.

Step 5 - Exiting CMOS
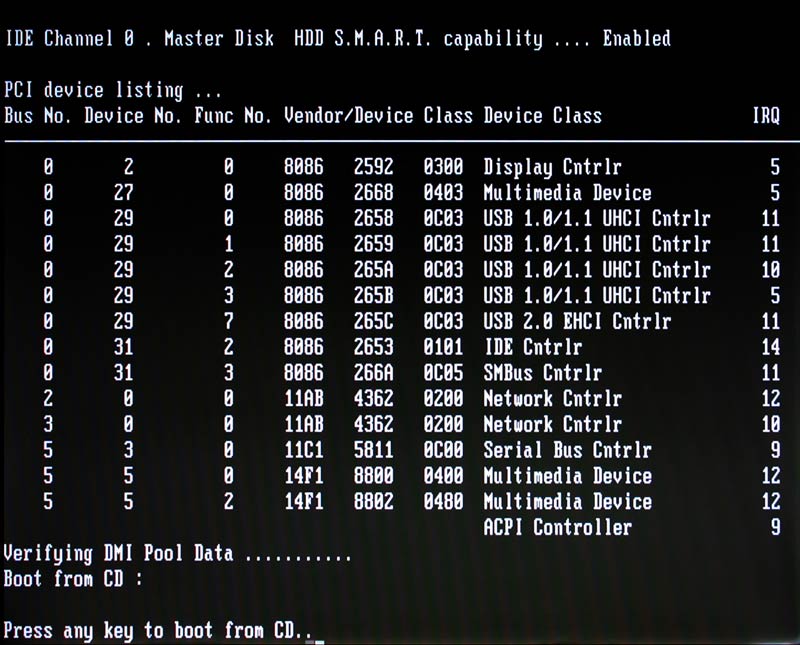
You’re now ready to exit the CMOS Setup Utility, but just before doing so, press eject on your DVD drive and insert CD1 of Windows XP MCE. Next choose “Save & Exit Setup” from the main menu, and when asked to confirm, press Y to apply your changes. Your PC will then restart and after a few seconds will ask on the screen for you to “Press any key to boot from CD” - see picture. Press any key and Windows will begin its installation process. Please note that you need to be very quick in pressing any key, otherwise you will miss the opportunity to boot from the CD!
Step 6 - Boot From CD
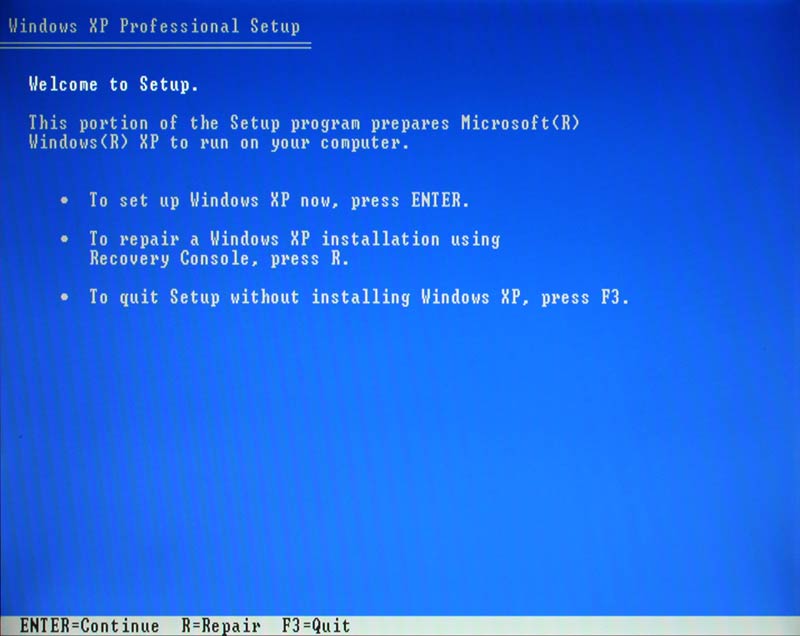
After around a minute, the following screen will appear; press the Enter key to setup Windows. You’ll then be shown the licensing agreement for Windows. Press Page Down to continue reading it, then F8 at any time to accept the agreement and move onto the next step.
Step 7 - Partition and Format the Hard Drive
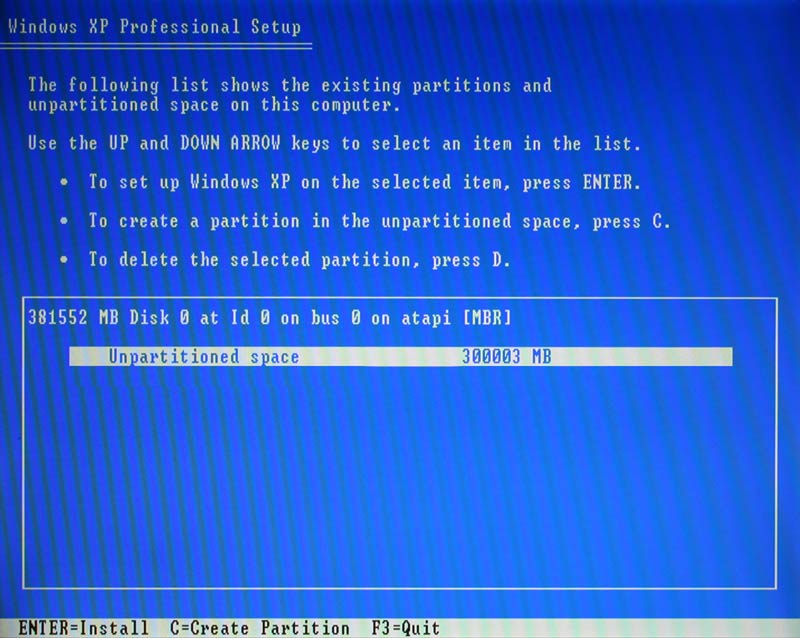
You’ll now be asked on which partition you’d like to install Windows; this refers to an area on your hard disk. If your hard disk has never been used before, it will simply be one large area of unpartitioned space. This will be shown on the screen, but depending on the size of your disk, the numbers of MB may be different to the example here. Make sure “Unpartitioned Space” is highlighted, then press Enter.
The partition will now need to be formatted and Windows gives you the choice of doing this with a Quick or standard option; select the Quick option unless you’re using an old hard disk which has been used in different computers before. The Quick option should take less than a minute, but the normal option can take several hours. Once the option you want is highlighted, press Enter. After formatting is completed, Windows will spend a few moments copying files onto your system, before automatically rebooting itself; you don’t need to do anything at this stage.
Step 8 - Starting to Install Windows
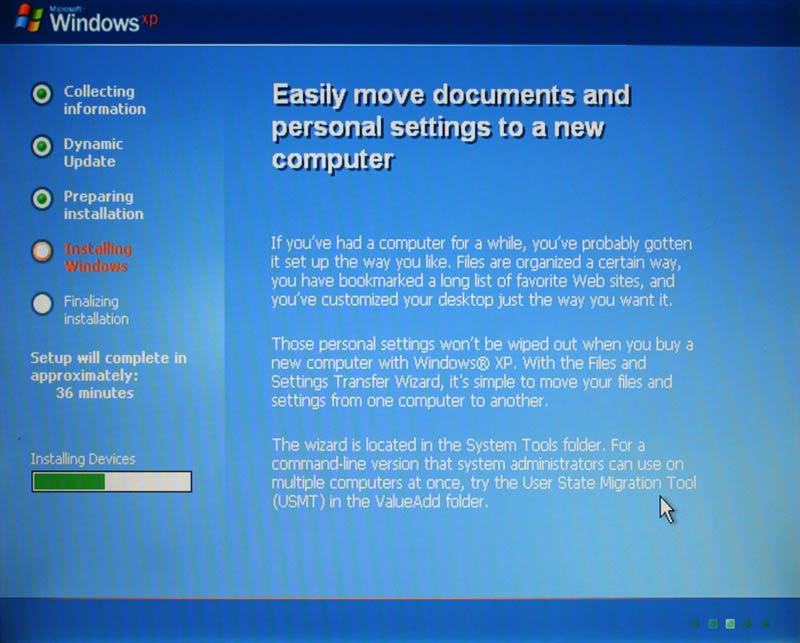
As your PC restarts, it will again ask if you wish to boot from the CD. This time though, ignore the message and let the Windows installer start itself. After a few seconds, you’ll see this screen and a few moments later a green bar will appear in the lower right corner to indicate the installation progress. From this point on you can use your mouse to select various options.
Step 9 - Choosing Your Location
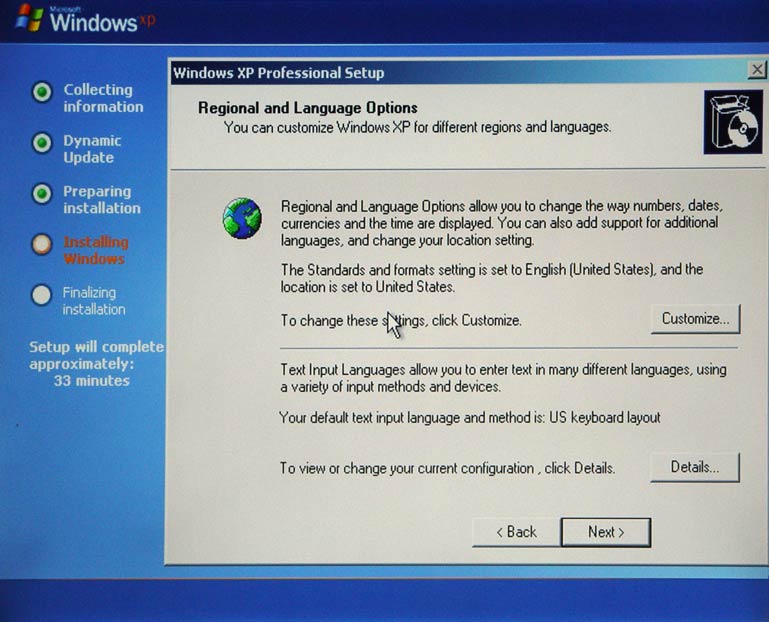
A few minutes later, the following screen will appear, asking you to customise Windows for “Regional and Language options”. It’s very important to select the correct language and location as this will later be used by Windows XP MCE to download the correct TV schedules for your region. Click the Customise button and choose your region from both the “Standards and Formats” and the “Location” pull-down menus. If you’re based in the UK, choose “English (United Kingdom)” from the Standards and Formats menu and United Kingdom from the Location menu. After clicking OK to confirm, click the Details button to change the “Text Input Languages” for the required location. Once you’re finished, click Next.
Step 10 - Input Windows Serial Number
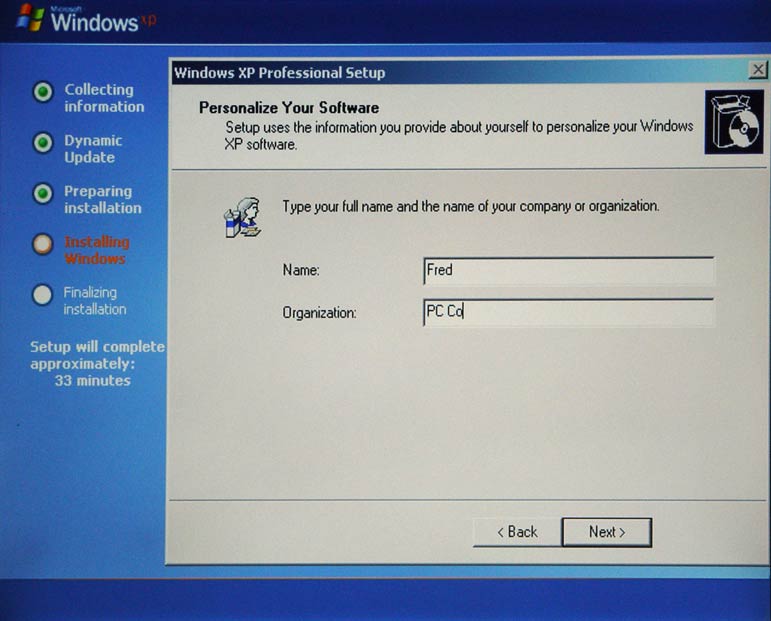
Next you’ll be asked to enter a Name and Organisation; these will later be used by Windows to identify the owner in various sections. Click Next, then enter the 25-character product key written on the yellow sticker on the back of the pack which your Windows CDs came in. Once this is entered, click Next.
Step 11 - Enter Your Details and Password
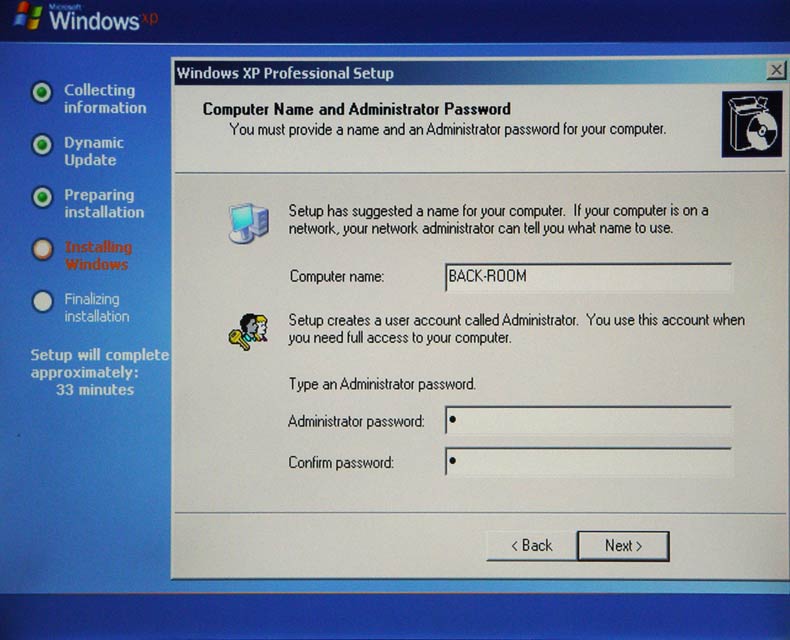
You’ll now need to enter a name for your computer, such as “MEDIA-PC”. You’ll also need to specify an “Administrator” password of your choice; enter it in both fields to confirm, then click Next. Don’t forget this password as it will be required at some point in the future in order to access or change certain settings. On the next screen, adjust the date, time and time zone for your region, then click Next
Step 12 - Network Settings
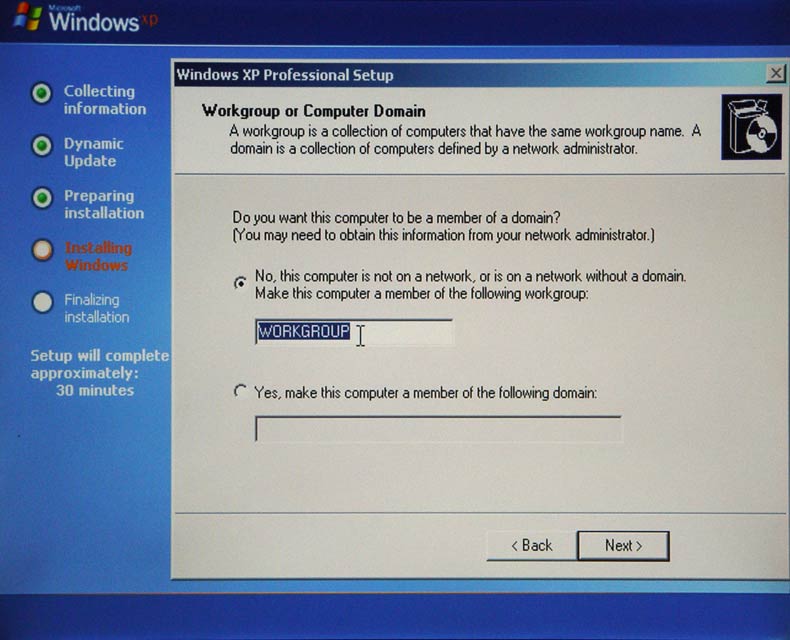
After a couple of minutes, Windows will ask for your Networking Settings. Unless you are a networking expert with unusual requirements, simply click Next to accept the “Typical Settings” option. On the next screen, pictured, you’ll have the chance to connect your computer to an existing or future home network.
If you already have a network at home and would like your computers to easily share files, they must all have the same Workgroup or Domain name, which is specified on this page. Domains are generally used by companies or advanced networking users, so if yours is a simple home network, enter the name in the upper Workgroup section, pictured. If you don’t yet have a network, you may still wish to think of a name and enter it here. You can alternatively skip this step. Once you’re ready, press Next.
IMPORTANT NOTE FOR ADVANCED USERS: Unlike Windows XP Professional, the Media Center Edition version of Windows XP does NOT allow you to change between a workgroup and domain infrastructure at a later date. You must decide whether to use a workgroup or a domain at this point in the installation of Windows, because it is not possible to change it later without a complete re-installation. So if you wish your Media Center to be part of a network which uses a domain, now is the time to establish a connection to it!
Step 13 - Service Pack 2
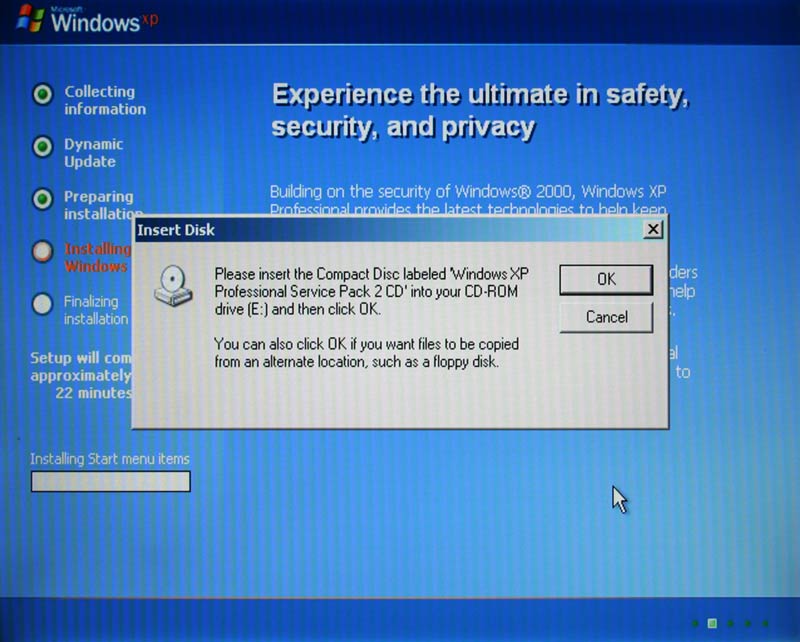
Shortly afterwards, Windows will ask you to insert CD2; do so then click OK. Not long afterwards you’ll then be prompted to insert “the CD labelled Windows XP Professional Service Pack 2” - see picture. This disc won’t be in your pack, but the required files can actually be found on CD1, so simply eject CD2, replace it with CD1 then click OK to continue.
Step 14 - Welcome to Windows
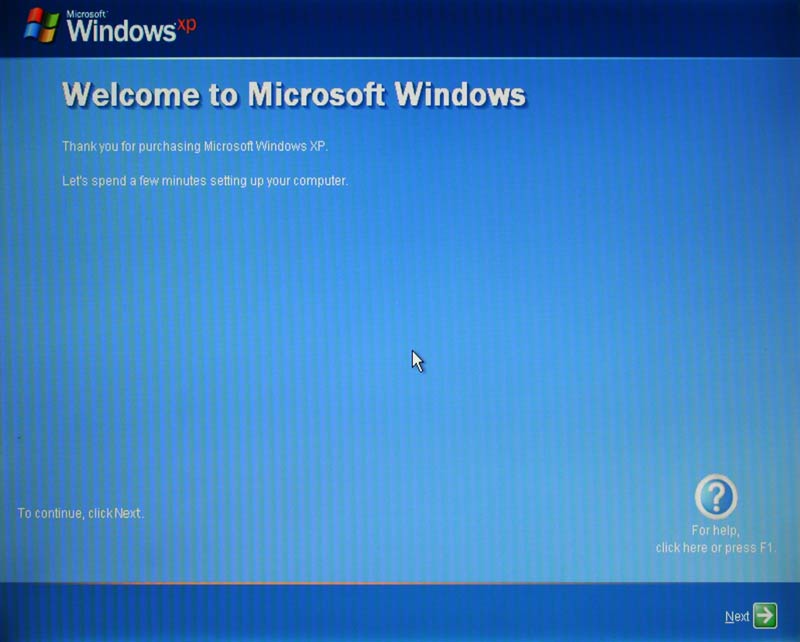
Windows will then continue to install various files, before pausing to automatically adjust your screen resolution. Once you click OK, Windows will pop up a new message asking if you can see it; click OK again to continue. You’ll then be presented with this screen, welcoming you to Microsoft Windows; click the Next arrow in the lower right corner to continue.
Step 15 - Security Centre
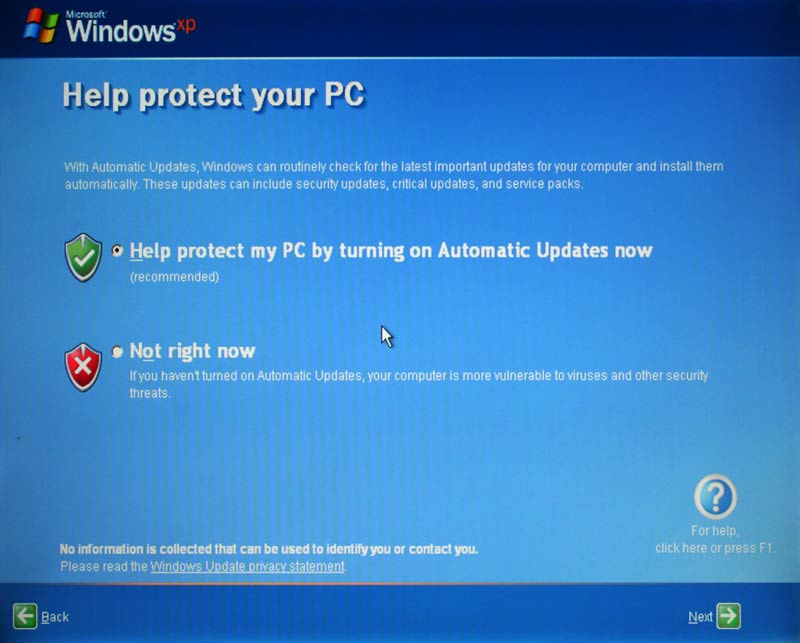
You’ll now be asked about protecting your PC - see picture. It’s best to select Automatic Updates, so click it, followed by the Next arrow in the bottom corner. Then on the following screen, enter the names of each person who’ll be using the computer. This will then generate an account with separate preferences and Documents folders for each. You can choose single or full names, or just one as desired. Click Next, then Finish on the next screen, and the main Windows installation will be complete.
Step 16 - Installing Motherboard Software and latest Graphics Driver
Now eject your Windows CD and insert the Bonus Disc which came with the Aopen motherboard. The “EzInstall” process should then automatically start, but if not, double-click the CD / DVD icon in My Computer. Once EzInstall is running, click the CD icon in the top left to install the motherboard’s drivers. The next page lists six drivers which should all be ticked by default; click the Go button to continue. The drivers will then automatically install, after which you’ll be prompted to restart your computer. After restarting, you may be asked whether you wish to install Realtek High Definition Audio; if so, click the “Continue Anyway” button.
The next very important step is to install the latest graphics driver from Intel. Most notably, unless you install the latest driver, we have found that the Quiet Media Center will often suffer from a blank display upon re-awakening from standby. To download the latest graphics driver, use the following link. We recommend that you save the graphics driver to your hard drive for later re-installation if necessary. https://downloadfinder.intel.com/scripts-df-external/Product_Filter.aspx?ProductID=1862

Step 17 - Installing the Black Gold TV Cards
The next step is to install the drivers for your Black Gold TV tuner cards. There is no need to install any additional software for the cards (other than the driver) because Windows XP MCE will tune the cards itself, later on. It is however important to install the drivers which were designed specifically to work with Windows XP MCE, as there are often different versions for standard Windows XP.
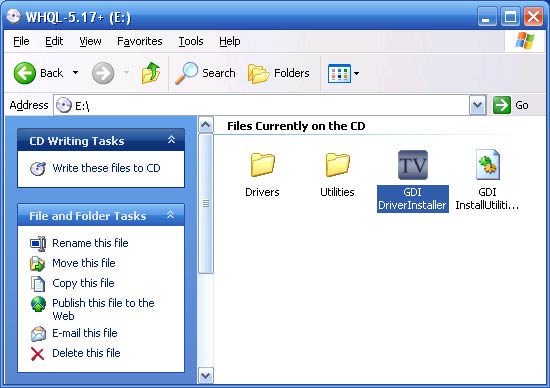
Please download the latest version of the Black Gold tuner cards driver from this link. Once downloaded and saved to a safe location on your hard drive for possible later retrieval, unzip the file and then double click the “GDI DriverInstaller” icon. This will install the drivers for the first tuner card; once complete, run it a second time to install the drivers for the second card. Ideally, you should install the drivers before installing the cards, but everything should work fine either way round.
Step 18 - Installing a Software DVD Decoder
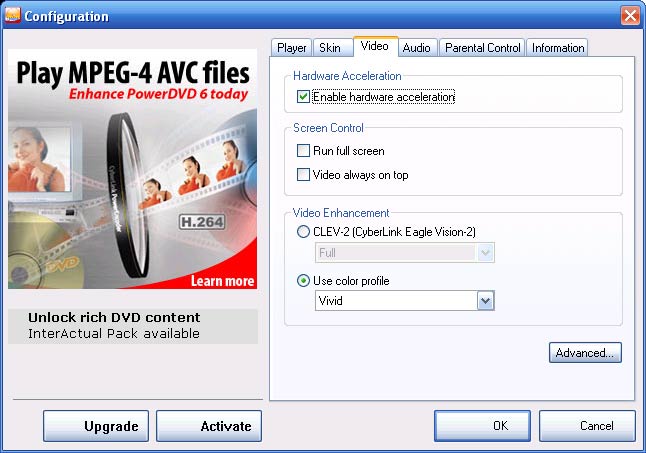
Windows XP MCE requires a software DVD decoder to be installed before it will work properly; this is required for watching TV shows as well as DVD movies. While several different software DVD decoders have been reported to work with Windows XP MCE, we recommend using Cyberlink PowerDVD version 6 or later because Microsoft guarantees it’s compatible. After installing the software decoder, make sure Hardware Acceleration is enabled in the video options. To do this, start PowerDVD, click the hammer icon to configure the software, then tick Enable Hardware Acceleration under the Video tab as pictured. Click OK, then close the program down.
Step 19 - Configure Media Center
Now you’re ready to configure Windows XP MCE itself, so click on the Media Center icon in the Start Menu to launch the Media Center setup Wizard. Throughout this process, simply select the desired option, then click Next to continue; you can use the remote control to do this if you like. The first question you’ll be asked is about your internet connection; select the option to allow Media Center to connect to the internet, then if you’re using broadband, select Yes on the next page for an “always on” connection.

Step 20 - Configure the TV Tuners
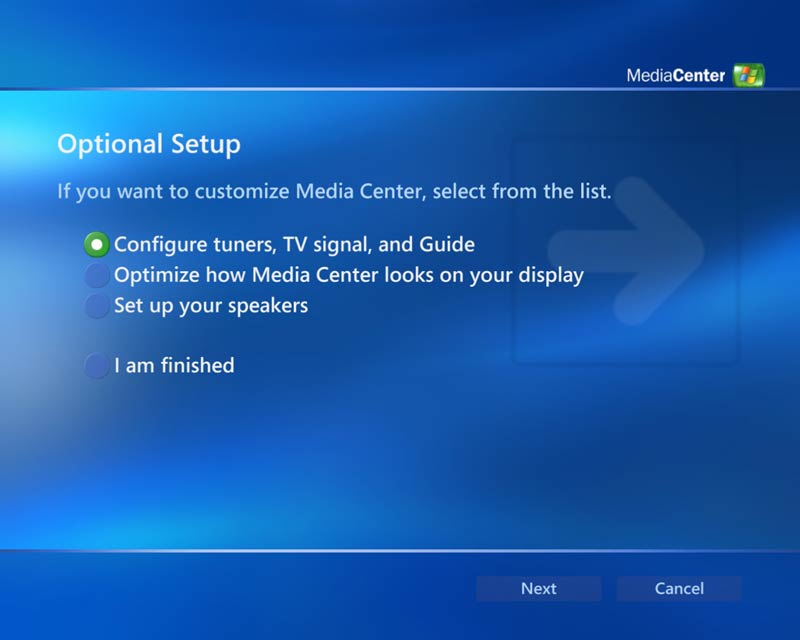
When the Optional Setup page appears, select the option to “Configure tuners, TV signal and Guide”. You’ll then be asked to confirm your region and whether you wish to tune one or two tuners. After this, agree to using the Guide and its terms of service, then enter your postcode. Media Center will then connect to the internet and present a list of local TV transmitters; select your local transmitter, then Media Center will begin to download the local TV schedules.
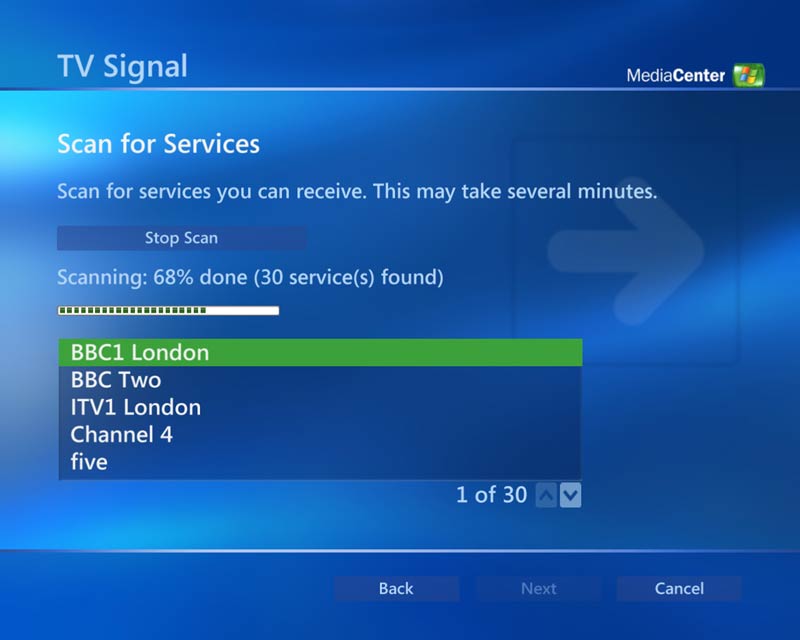
Step 21 - Tune-in the TV Tuners
When the Scan for Services page appears, select “Start Scan” to automatically tune your cards; this process, pictured, takes a few minutes. Once completed you’ll have the option to optimise how Media Center looks on your display or setup the speakers, but if you like you can select or click on “I am Finished” and start using Media Center straightaway.
Step 22 - Essential Tweaks
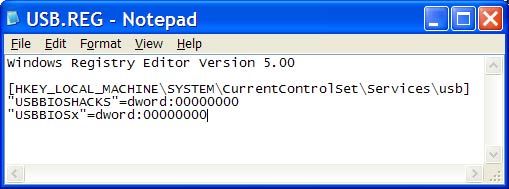
Windows XP MCE may now be officially installed, but you’ll need to tweak a couple of items to ensure smooth operation. First is a small modification which allows the system to put itself to sleep and wake up again properly when you press the power button on the remote control. To do this you’ll need to make a small adjustment to the Windows Registry.
First quit Media Center then open Notepad; this can be found in the Accessories section under All Programs on the main Windows Start menu. Now type in the following bold lines, taking care not to make any mistakes - it should look like it does in the picture.
Windows Registry Editor Version 5.00
[HKEY_LOCAL_MACHINESYSTEMCurrentControlSetServicesusb]
“USBBIOSHACKS”=dword:00000000
“USBBIOSx”=dword:00000000
Now save this file onto your desktop with the name USB.REG. Next exit Notepad and double click the USB.REG file which should be on your desktop; this will automatically make the required changes. Finally restart your PC and it should now suspend and wake up again correctly when you press the power button on your remote control. You can now delete this USB.REG file.
Step 23 - Missing E4?
When new digital channels are launched, Windows XP MCE can sometimes pick them up automatically, or may require a manual rescan from its Settings / TV page. One exception is for digital viewers in the UK who can receive channel E4+1, but not E4. This requires another small adjustment of The Registry which is fully explained by Microsoft at the following link:
https://support.microsoft.com/kb/902761/en-gb
Step 24 - Install the VFD
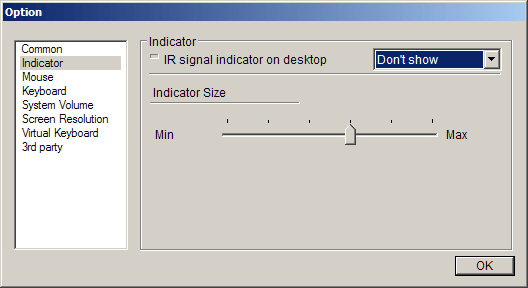
Now Media Center is fully operational, it’s time to get the iMON display in your case working. If the iMON display came with a CD, you can install the iMON/iMEDIAN software now. However, The latest version can be downloaded from https://www.soundgraph.com/. This website will also have any updates to the latest official version, whether you downloaded it or installed it from a CD. We always recommended using the latest driver so if they are any updates on the Soundgraph website we highly recommend you use them.
Once the iMON software has been installed you may notice that a volume control is always onscreen. To remove this just right click on the iMON symbol in the task bar (small round black circle) and click Options. Click on Indicator on the menu to the left then change the IR Signal Indicator on Desktop from Always Show to Don’t Show. Once complete click finish.
Step 25 - Overclock the CPU
Your Media PC will be sufficiently powerful to record TV shows, along with playing DVDs and a number of High Definition files, but if you would like it to run a little faster, you may be able to overclock the processor.
Overclocking forces a processor to run faster than it’s officially designed to go, thereby giving you extra performance for free. On the downside it may not work reliably and in the long term might even reduce your processor’s overall lifespan. Overclocking will also invalidate your warranty, and we cannot support you if anything goes wrong - it is a risk you’ll have to take by yourself.
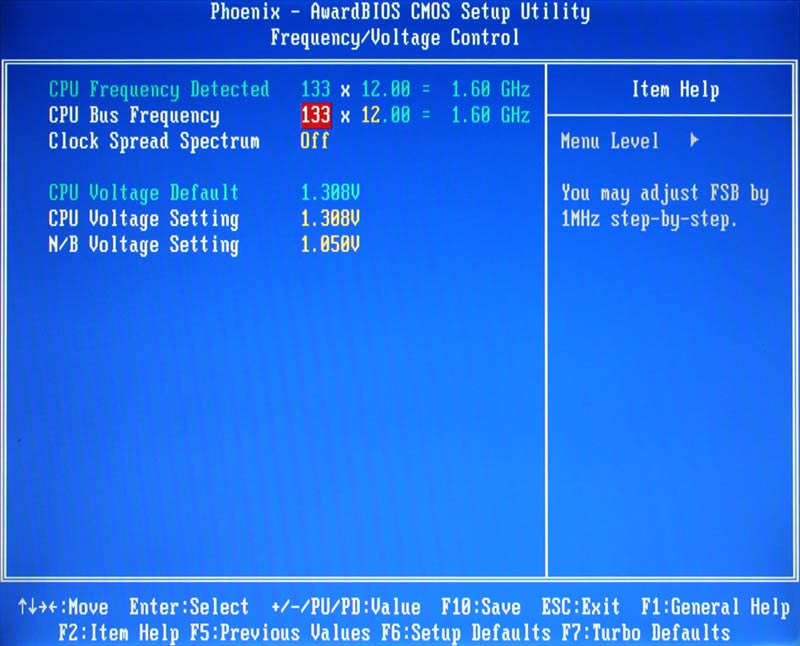
That said, the Pentium M processor in your Media PC can normally be overclocked very easily and reliably. If you would like to give it a try, bearing in mind the warnings above, restart your computer and press the Delete key to enter the CMOS Setup Utility. Now go to the “Frequency / Voltage Control” section and change the “CPU Bus Frequency” from 100 to 133. If you are using the Pentium M 735 processor, the line should now read “133 x 17 = 2.26 GHz”; note this is different to the picture.
Now press Escape to return to the main menu, then choose “Save & Exit Setup”, and when asked to confirm, press Y to apply your changes. Your PC will now try and start up at a speed 33% faster than before - if you’re using the Pentium M 735, it will be running at 2.26GHz instead of 1.7GHz.
If the processor is happy to run at this speed, Windows will start normally, but try running a few programs first to make sure. If the processor is not happy at this new speed, your system could behave erratically or suddenly freeze. If this happens, restart your PC, press Delete to enter the CMOS Setup Utility, then go back to the “Frequency / Voltage Control” section and change the “CPU Bus Frequency” from 133 back to 100. Once you’ve exited and saved changes, your processor will be clocked normally again.
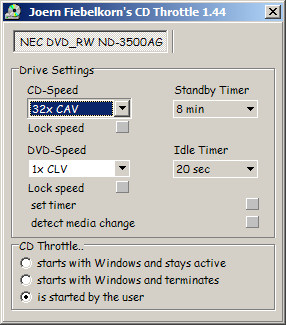
Step 26 - Noisy optical drive?
Some customers have reported that a high level of “whooshing” noise is produced whilst a CD or DVD is playing in the Media Center. This is due to the data being read from the drive at a very fast speed, in order to buffer data and ensure smooth playback in the event of a mildly damaged part of the disc being read. Usually, this high speed reading process is of little benefit and is highly annoying. If excessive disc noise is a problem for you, we would recommend that you try a German program called “CD Bremse” (CD Brake) which will slow down your drive using software, and therefore make it run a lot more quietly. Performance is not noticeably affected. You can download the program free of charge at this website: https://www.cd-bremse.de . The website and software installation routine are in German, but the program itself runs in English and runs discreetly in the Windows System tray at all times (if desired).